How – And How Not -- to Photograph Your Trophy Bass
One of the greatest regrets of my life is that the pictures of my PB largemouth – a 12 pounder caught from Camelot Bell in Texas in 2012 and weighed on a Boga Grip with two witnesses – don’t make the fish look all that big. If I could go back in time, I would redo them and have a better record of one of the most important catches of my life. Since that can’t happen, however, I guess I’ll just have to remain on the tough hunt for a 12-01.
If and when you’re fortunate enough to catch the trophy bass of a lifetime, or even just a “Harry and Charlie Good Ol’ Big’Un,” you’ll want to memorialize it with a photo. Decades ago, that might’ve meant a single, fading Polaroid, or a snapshot from a cheap camera. Today, not only do we have incredibly advanced camera equipment, but the phone that you carry with you everywhere is likely as good as yesterday’s big SLR.
As I see it, there are two main, counterbalanced goals when you take a picture of the fish of a lifetime:
You want to do the fish justice; and
You don’t want to look ridiculous.
The best way to achieve both of those goals, and to retain accuracy and vibrancy, is to travel with a skilled photographer with top-flight equipment. Of course that’s not always feasible for a variety of reasons. Fortunately, as noted above, modern cell phones are remarkable instruments for this task. I’ve seen photographers like James Overstreet get world class shots with just an iPhone. Even if you’re not willing to put in the time to learn all of its features, or how to professionally edit your shots after the fact, with a few simple steps it’s possible to improve your game and keep a great record of your memorable catch. Here are a few things to keep in mind in furtherance of those ends:
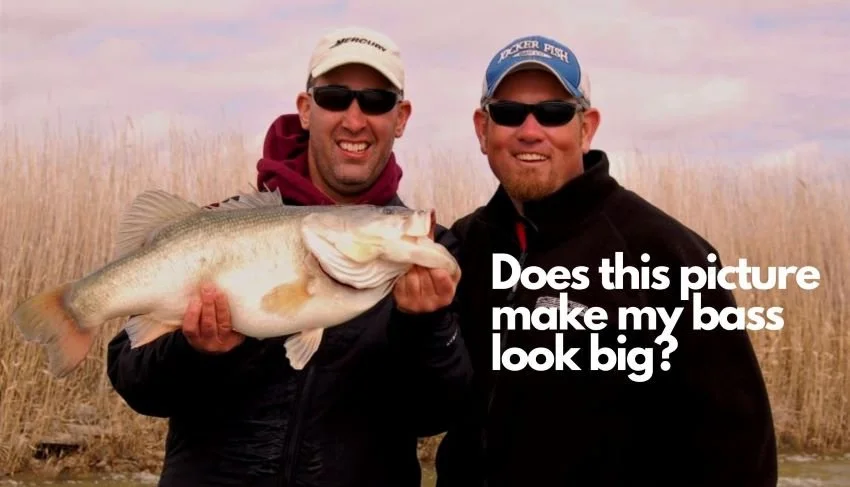
Know What a True Trophy Looks Like -- Most people have not caught a 10-pound largemouth, let alone a 12- or 15-pounder. They haven’t caught a 6- or 7-pound smallmouth, either. They may claim they have, but they haven’t. When you hold up what is clearly a 3 and call it a 6, or take a legit 8 and say it’s 12, you invite ridicule. Furthermore, you’re going to cause people to question all of your other catches and claims. Go through old tournament pictures, where fish have been weighed on calibrated scales, and see what trophies look like. Two legit 10-pounders may look very different – either because they’re built in varying ways, or because the angler/photographer did a better or worse job of capturing the fish’s grandeur. Take note of what makes a true trophy appear that way without looking cartoonish.
Take Your Time -- Once you have your trophy fish in the boat and you’ve measured and/or weighed it, don’t rush things. Yes, you want to get the fish released in good condition, but you can accomplish that in a variety of ways. If your boat has an aerated livewell, stick the fish in there and let it recuperate. This is several side benefits:
With smallmouth in particular, some time in the livewell tends to bring out their “tiger stripes” for more attractive pictures; and
It allows you to keep on fishing while a school may be fired up and biting.
You don’t want to remove the bass far from its habitat, especially if it’s spawning or protecting fry, but a few minutes of rest allows you to get over the excitement, think about your background (no spot burning!) and pose, and take a carefully-contemplated shot or shots.

Instruct, Instruct, Instruct -- It’s in your best interest to get great shots of this meaningful fish. Your partner may not feel the same urgency. In fact, he or she may be a bit peeved that you caught the trophy instead of them. Even if there’s no such anger or disappointment, they may not be skilled in the art of taking great fish photos. Tell them how you want it done – vertical vs. horizontal, zoomed in or pulled out, etc. Then check the digital pics before you put the fish back to make sure they nailed it. Even if they followed your directions to a “T,” a stray finger over the lens can ruin everything.
Proper Light – Turn the boat around so that you are facing into the sun, assuming that the sun is shining. This will produce better light on the fish and on you. I know that some people strongly prefer pictures with no sunglasses, but if the bright sun in your eyes causes you to squint, then go ahead and wear them.
Not enough light and a hand across the tail hurt this shot.
Big Hands – This is my biggest pet peeve with bass photos. Someone posts a pic of what appears to be a quality fish, but they’re holding it out WAYYYY in front of them. It could be 6 pounds. It could be 8. It could be 10 as advertised, but the fact that they have fingers befitting Andre the Giant makes me question their veracity. If the fish is right in front of the lens, even if it makes your largemouth look like a grouper, there will be a disqualifying air of inauthenticity around it. Also, the holder’s fingers shouldn’t cut off large portions of the fish. If they’re wrapped around the tail or up the side of the body, it detracts from the overall picture.
Hold it Right -- It’s critical that you support big fish in a manner that doesn’t break their jaw or otherwise do them harm, but beyond that you need to put your (or their) best foot forward. That means no “two finger pinch grip” for a straight up and down fish. No holding in close to your body (the opposite of the “big hands” issue, above) by your waist. Make sure that if the fish is fat you’re not obscuring its belly, and if it’s long (or even if it’s not) that the tail is not curled in a manner that makes it look shorter or deformed. Also, if the fish has one side that looks better than the other, make sure that the good one is facing the camera.

It’s hard to tell how truly giant this bass might be because of the awkward pose. Also, the poor lighting and buff make it difficult to identify the angler.
Pose Without Clutter – Unless there’s a compelling piece of background information or scenery, make you and your fish the primary or entire focus of the shot. Fill the screen or nearly fill the screen with you and your quarry, that’ll make for better shots and show off your catch without distractions.
Don’t Block Yourself or the Fish – Along the same lines as the “no clutter” admonition, above, make sure that there’s nothing blocking you or the fish from full view. While you might want the rod and reel, or the lure, in the shot, there shouldn’t be line or a rod blank in front of your face or anything blocking the primary subjects.
This would be a decent shot except for the fact that the line cuts across the angler’s face.
Take Lots of Photos – It’s not like the old days where you needed to preserve your precious film. Your electronic device should have storage space to take a nearly endless number of still photos. If it doesn’t, clear out some room. Assuming it does, try different angles, different fish positions, different distances and so on to make sure that at least one turns out great.
Grip and Grins Aren’t Everything – Ultimately, you’re going to want at least one great “grip and grin” photo to constantly remember your prized catch. This will be the one that you put on your office wall, use as your screensaver and so on. However, there will likely be other memorable things about your catch. They might include the lure you used, the place where you caught it or who you were with. Get some additional shots of these factors, plus anything else that might be memorable (e.g., the release).
Final Notes
Before you go out, if you think there’s a chance you’ll catch a trophy (and who doesn’t think that EVERY day?), consider what you wear. Do you want that ratty white t-shirt in the shot? Or the hat that says “Mustache Rides 5 Cents”? Some colors show up better on camera than others, and some outfits should be banned from public altogether.
After you get that “shot of a lifetime,” there still may be room for improvement. You can crop it, add or subtract light, or enhance the color. While aftermarket programs like Photoshop are made for this, in all likelihood you can do it with the existing photo software on your computer or even your smartphone.
If you’re considering a replica, take lots of close up pictures of any distinguishing characteristics on the fish – special markings, odd dimensions, and so on. This is especially the case with species like peacock bass or mahi mahi, but you’ll be surprised at how many smallmouth and largemouth replicas DON’T look like the original fish. Often it’s because the taxidermist didn’t have much information to work with.
This article has primarily focused on largemouth and smallmouth bass (and implicitly spotted bass as well), but if you’re chasing a species that you’re less familiar with, be sure to consider handling and photography concerns ahead of time. Some fish, like stream trout, need to be handled more gingerly (and you likely won’t have a livewell) while just about every species benefits in terms of photography from certain poses. Figure out some of those poses from others’ pictures so you’ll be ready when the time comes.

The finger at the top left can be cropped out.
Elbows tucked in would look more natural and the fish should be held higher.

If the other side of the fish is “cleaner” it would likely produce a better picture.

Make sure your photographer centers the shot, if appropriate, and gets the entire fish in the viewfinder.